SOILS Permaculture Association Lebanon
Follow us
  • Home
  • About SOILS
  • Permaculture Design Certificate (PDC)
    • PDC 2016
    • Previous Editions >
      • Blog PDC 2015
      • Photo Gallery PDC 2015
      • Blog PDC 2014
  • Workshops / Courses
    • Preserving Local Seeds
    • TOT Crisis Gardens
    • TOT school and micro gardens
    • Introduction to Beekeeping
    • Advanced Beekeeping
    • Agroecology training 2021
    • Sustainable Agriculture
    • Advanced Permaculture Design
  • Our Blog: Articles, DIY
  • SOILS Newsletter
  • Publications
  • In the media
  • Friends of SOILS
  • Contact us

DIY NATURAL BEESWAX POLISH FOR WOODEN FURNITURE

8/11/2016

14 Comments

 
Submitted by Alexis Baghdadi

Wooden furniture has a real personality, but it takes care and maintenance to preserve its sheen. Commercially available polishes contain chemicals or petroleum derivatives you are better off avoiding. You could always order natural polishes from specialized stores or online, but it’s more fun to make your own.

For a small jar of polish you will need:
  • 30 gm of beeswax*
  • 90 gm of olive oil**
*you can get beeswax from a beekeeper or stores that sell beekeeping supplies.
**Any commercial olive oil will do, as long as it does not have hanging particles in it.
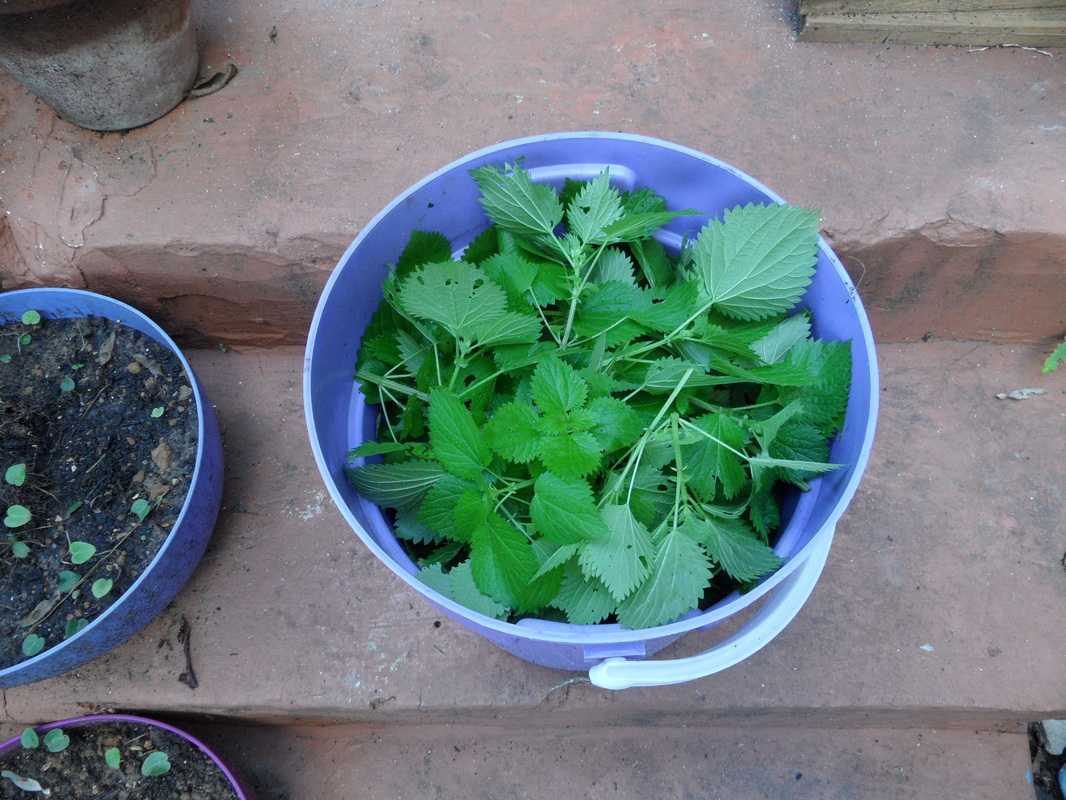
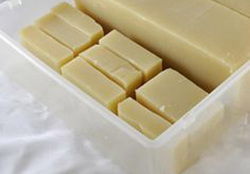
For the photos in this article, I used old wax (dark caramel color). New wax made by bees (or the type you buy in sheets at beekeeping supply stores) is a pale blond color. As the wax stays in the hive, though, it turns a darker color and gathers dust, pollen residue and other impurities. I had to boil my wax twice to separate it from any unwanted substances.

​
Instructions:
First, break the beeswax into small chunks and melt it on low heat in a double boiler. I used an old stainless steel coffee pot which I placed in a wider pot filled with water. Beeswax is flammable, so you want to avoid putting it in direct contact with fire

When the beeswax melts completely, add the oil. Because the oil is colder than the wax, it will form clots at first, but the two substances will eventually blend in a minute or so (if necessary, you can stir them with a spoon to accelerate the process). to form a homogeneous substance with a slight green hue (because of the olive oil).

When you get a homogeneous greenish liquid mixture, it's time to turn off the stove and pour your polish in a glass jar. Attention: Once it cools, the beeswax polish becomes solid and hard to remove from its container. For this reason, it is better to pour it into its definitive container right away. The ideal container should not be too tall, and should be wide enough for your hand to reach the bottom with a cloth.
 
Some online recipes suggest adding a few drops of essential oil (lavender, cinnamon, citrus) to the mixture before pouring it out, but this is entirely optional (I didn't add any because I thought it smelled great).

Hardened beeswax polish turns slightly yellow or off-white. Because I used old wax, my polish was latté-colored. This is of no consequence whatsoever; when applied, the polish is virtually colorless and only helps bring out the wood's natural colors. The results are quite noticeable at the end of the process.

Dab a little wax on a cotton cloth then apply it in a thin layer to your wooden surface. If the temperature is too cold, the wax might be too hard to handle, so you can warm it to melt it a little. Applying the wax requires patience and care, but it is very efficient and economic. You then need to wait 6 to 8 days for the wood to absorb the wax completely.For very dry and damaged surfaces, you might need to apply a second layer and wait again.

Attention: The wood you wish to coat with polish should be clear of any paint or varnish. You might need to sand down the surface or use paint remover to get rid of old coats.

Beeswax polish is a completely natural substance that has no toxicity whatsoever. You can safely use it to coat any solid wood furniture like desks, chairs, coffee tables, cabinets, as well as dinner tables and surfaces where you put your food.

Try this the next time you want to give your wooden furniture a new life.
14 Comments

MAKE YOUR OWN TABASCO SAUCE LOCALLY

7/20/2015

2 Comments

 
Submitted by Alexis Baghdadi

It's that time of the year again: pepper season.

I like hot peppers, and Tabasco peppers (Capsicum frutescens) happen to grow very well in my family’s small garden in Beirut. I usually pickle or dry my pepper harvest (check out the recipes in this previous blog post), but last year I promised myself I would make hot sauce this summer. And so I did.

If you like hot sauce like me, you are probably buying McIlhenny’s Tabasco pepper sauce from the store. From what I can tell, it’s a pretty decent brand, and quite affordable. But making my own sauce instead of buying it does have its attraction, and it looked easy enough. After all, there are only 3 ingredients listed on the bottle: Tabasco peppers, vinegar and salt.
I looked up a few recipes online and I found that the list of ingredients was pretty consistent across all of them. Some recipes called for sugar and garlic too, but as a rule I prefer to steer clear of sugar. Finally, the recipe I ended up adopting was the closest (I think) to the McIlhenny Tabasco Pepper Sauce. It was really easy and quick:

Ingredients:
  • 450 grams of fresh, de-stemmed red Tabasco peppers (I picked mine from my garden)
  • 2 cups of white vinegar (read the ingredients, I found some brands used flavoring!)
  • 2 tsps of salt (I used ground rock sea salt)

Instructions:
Put the vinegar and peppers in a saucepan and heat them (you can use the peppers whole, but some recipes I found suggested chopping them first). Add the salt and mix well, then cover the mixture and let it simmer for 5 minutes. 

When the mixture cools down, pour it into a blender and blend it until it looks like a puree. After that, strain and press the mixture well to get rid of the pulp, place the juice in a sterilized jar and refrigerate. After 2 weeks, strain the mixture and add some white vinegar to adjust the consistency if it is too thick.

Some recipes I found suggested refrigerating the entire mixture, then straining it after 2 weeks in the refrigerator. It shouldn’t make any difference, so it is really up to you.

2 Comments

FIRST STEPS IN ENTOMOLOGY: ADVENTURES IN "INSECT LAND"

4/4/2015

5 Comments

 
Submitted by Wael Yammine

There is an intricate and fascinating world out there just waiting for us to explore it, and it's called "insect land". Insects and mother nature have a lot to teach us. Finding out which insects visit your garden is the first step towards understanding the relationships between them and the different plants, birds and soil so you can better monitor life around the year.

As far as I remember, I was always fascinated by insects. When I was a little boy, I always tried to capture crickets, I tied green scarabs by a string and let them fly in circles. I even used to eat ants to find out how they tasted (yes, my childhood was strange and wonderful).

Today, people still see me running around in the fields chasing after butterflies and other insects - but I do it for different reasons. My dream is to become an entomologist (a scientist who studies insects), so I now take a scientific approach to my hobby.


To observe insects, you need to identify them. For that, you will need to capture a few specimens and examine them calmly. But catching insects isn't as easy as you think. Do you remember how difficult it was as a child to try catching a small grasshopper in the daytime? It will take you even more effort to catch a field cricket at night. Luckily, there are scientific methods and techniques that help you save time and effort. 

There are many kinds of traps, but here are 3 simple and affordable ones you can build on your own. These traps are a form of passive collection and should only be used for ecology studies.

Light Trap
This trap is used to capture nocturnal insect that are attracted by light (such as moths and also flying coleoptera - beetles - like the polyphylla fullo), so it only works at night.

You will need:
-2 funnels of the same size (opaque)

-Black light or small 12 V lamp with battery
-A plastic jar with a lid
-Epoxy glue
-Plexiglas "x" shape (at least 20 cm tall, no wider than the funnels)
-Some metal wire 

Cut a hole in the lid of the plastic jar so the first funnel's narrow base can fit snugly. Use the epoxy glue to fix the Plexiglas "X" standing up in this funnel, then fix the funnel in the jar. Insert the lamp and cable into the second funnel (the funnel’s narrow end should be up). The cable should be connected to a battery and should be long enough to reach the ground (the trap will be hung on a tree or above a door). Now, insert the metal wire through the funnel to hold the lamp in place (it should not be lower than the funnel base, but also not too close to the plastic surface). You can punch 2 holes in the funnel and let the wire pass through them. The wire should be long enough to curve back upwards and form a closed circle. When this is done, stick the second funnel (with the lamp inside it) over the Plexiglas “X” (see the final trap in the picture on the right). Voila! Turn the light on at night and hang your trap.
Picture
Homemade light trap
Pitfall Bait Trap
This trap is not expensive and is very effective for catching crawling insects that are attracted by smell (such as beetles, ants, etc.). 
You will need:
-2 long solid plastic cups of the same size
-Garden tools to dig a hole 
-A small cardboard or plastic square
-Bait (vinegar, sugar water, beer, etc.)

Dig a hole in your garden or the field you want to monitor. Put the cups inside each other and fit them snugly in the hole. Making sure that the edge of the inside cup is at the same level as the soil around it. Place the bait into the cup. Place 4 small stones around the cup and lay the cardboard square above it (maximum 5 cm raised above soil level) with a larger stone to keep it in place. This "roof" will protect captured insects from the sun or predators.
Check the trap every 4 days for insects. 

Note: In rainy weather, it is better to use a plastic square and tilt it so water will flow off it.

*Having 2 cups means that when you remove the inside one, the outer one will stay in the ground and preserve the hole shape if you want to use the trap again. 
Picture
Homemade pitfall bait trap
Picture
Internet diagram for a simpler model
Color Trap
This trap is for catching insects attracted by color radiation (such as leafminers, ladybugs etc.). 
You will need: 
-2 cardboard squares (yellow and white)       

-Some string
-Slow-drying latex or plastic glue (glue)
*You can mix the glue with water so it will take more time to dry out 

Pour glue on the squares then attach them with strings to a tree or pole. They will attract some beneficial insects (ladybugs, Braconidae wasps) and pests (white flies, aphids, tree bugs).

Picture
Identify your crawlers and fliers
Now that you have your first insects, you should try to identify them. In Lebanon this is a little difficult. Unfortunately, there aren't many local experts or resources on insects. Publications about insects are limited to academic researchers in the field and there isn't a book that covers all common insects in the country (unlike books about plants and birds).

Here are some useful books available locally or online:
• Butterflies of Lebanon T. Larsen. Publisher: CNRS Lebanon (ISBN: 0 900848 73 1)
• Dragonflies of the Aammiq Area, Lebanon  A Rocha Lebanon*
• Butterflies of the Aammiq Area, Lebanon A Rocha Lebanon*
*See: http://www.arocha.org/lb-en/resources/publications.html)
• The Dragonflies of Europe  R. R. Askew. Publisher: Harley Books (ISBN 0 946589 10 0)

The Facebook group Plant production and protection in Lebanon sometimes discusses local insect pests:
https://www.facebook.com/groups/679096865445785/ .

To identify the insects I find, I ask university professors or use these websites:
http://www.biolib.cz/ and http://bugguide.net/node/view/15740.
Insects: What is really at stake?
It is vital that we enhance our knowledge of insects. For example, around most of the world, butterflies are known by both their common (vernacular) name and their binomial (Latin) name. But in Lebanon and most of the Arab world probably, butterflies and moths are all called generically "فراشة" farasha. The Vanessa atalanta is a colorful butterfly that is quite common in Lebanon and easily identifiable . In French it is known as "Vulcain", in English "Red admiral", in Spanish "Numerada", in Italian "Vulcano", etc. Can you guess what it is called in Arabic?

On the local level, we urgently need to update and publicize documented species of endemic insects in our region. Unfortunately, because war has changed the geopolitical map in the past decades, there is a movement to give some species new names and our region risks losing its identity not only when it comes to entomology, but also with botany, zoology, ornithology, etc. In the bigger picture, insects are the most dominant phylum in the animal kingdom and have a huge biodiversity. One of the most sensitive issues on the agenda of the Food & Agriculture Organization (FAO) is identifying insect species as a new source of protein to fight famine.

I am not an expert but I’m passionate about insects and I want more people to take an interest. If you’d like to find out more, email me and I'll be happy to point you in the right direction:

waeljeanyammine@hotmail.com
Picture
A sample of my insect collection
Picture
Stick insect (leptynia hispanica) and me
5 Comments

NETTLE TEA - BREW YOUR OWN LIQUID NATURAL FERTILIZER

1/14/2015

26 Comments

 
Submitted by Alexis Baghdadi

When the rain season started this year, I brewed my first batch of "nettle tea". With just one bucket of nettles picked from my neighbors' abandoned plot, I got 10 times that amount of liquid natural fertilizer, with a lot left over to give away.

The common or stinging nettle (Urtica dioica - القرّاص) is a beneficial weed that is quite widespread so it is easy to gather. It is rich in nitrogen, which makes it a good activator for compost. Nettle tea supplements plants with nitrogen, chlorophyll, magnesium, sulfur, iron, potassium, copper, zinc and calcium. You can also find recipes for nettle soup, drinks and other culinary uses online if you're feeling adventurous.

Like many new "permies" I know, I had read about nettle tea online and in books but I had never actually gotten around to try it for some reason. This year, I was lucky to be able to spend more time in the garden and observe the changing of the seasons, so I was ready when the first nettles started sprouting. When I found how easy it was to make this fertilizer, I decided I would make it every year and encourage more people to do so too.


All you need is a bucket with a lid, pruning shears or scissors, gardening gloves and some rainwater. Here's what to do:
1. Cut enough nettles to fill a bucket. You should choose plants that aren't carrying any seeds and cut them at the base so you don't get any roots or soil. When I gathered my second batch (Dad accidentally knocked over part of my first batch while it was brewing), I had to watch out for snails who had eaten through most of the patch and were still hanging on (I didn't want to risk killing them unnecessarily).
Attention: Use gardening gloves to protect your hands (stinging nettles sting!)

2. Trim the plants inside the bucket with pruning shears or scissors. You can leave the plants whole and get the same results, but it is much easier to handle the brew later (stirring and filtering) if the cuttings are trimmed short.

3. Fill the bucket with clear rainwater a little under the top and cover. As the nettle tea brews, a layer of foam might develop, so you need to leave some room for it. The tea will smell unpleasant during brewing, so you don't want it to spill and overfill.
Attention: It is better to use rainwater as it doesn't contain chlorine, fluoride or other chemicals that may inhibit the beneficial qualities of nettles.
Alternative: You can put the trimmings inside a cloth bag and tie it closed before adding water. This works like a tea bag and makes it easier to filter the tea later.

4. Place the covered bucket in a warm sunny place and stir every 2 days or more. I stirred mine every morning because it only took a few seconds.
Your nettle tea will be ready after around 2 weeks when it stops bubbling (in cold places with little or no sunshine, the brew might require an additional week).

5. Filter the nettle tea over a wide container using an old cloth (or, if you used the "tea bag" method, simply squeeze it dry) and use only the clear-ish liquid.

How to use your nettle tea
Brewed nettle tea will last up to 6 months, enough to get you through the growing season (spring).

To use as a fertilizer, mix 1 part nettle tea with 10 parts water (1:10) and pour the mixture at the base of plants where roots will absorb them more easily.

This fertilizer works best on plants that have a high demand for nourishment such as fruit trees and bushes, roses, annuals and perennial flowering plants. It works for tomatoes, leeks, brassicas, cucumbers and courgettes. However, it is not meant for beans, peas, onions, potatoes and root vegetables. Apply nettle tea to your plants every 3 weeks in the growing season.
Picture
Picture
Picture
Picture
Note: You will still need to add compost and mulch to adjust the soil’s Nitrogen-Carbon ratio.

To apply on leaves, mix 1 part nettle tea with 20 parts water (1:20) and add 1/2 a teaspoon of liquid detergent to each 4 liters so the tea adheres to the leaves.

Undiluted nettle tea is great for making compost, as it speeds up decomposition. The leftover green mush from the tea can go right onto your compost heap.
26 Comments

PRESERVE RED HOT CHILI PEPPERS ALL YEAR (DRIED/PICKLED)

7/15/2014

6 Comments

 
Submitted by Alexis Baghdadi

This time of year (July-August) marks the harvest season of red hot chili (or chile, or chilli) peppers in Lebanon. If you are into intense sensations, you can eat your raw peppers right off the plant. But you can also preserve your harvest to last you the whole year as pickles or dry pepper.

Red hot chili peppers (I recently learned they are in fact tabasco peppers - Capsicum frutescens - and quite common in Lebanon), are some of the food plants that grow well in my small garden in Ashrafieh - Beirut. For the past 4 years, I have had a good harvest every summer, so I end up making presents of pickled tabasco peppers to those of my friends who can "take the heat".
Read on to find out how to pickle peppers or dry them. I gathered my information from Barbara Abdeni Massaad's book, Mouneh,and different other online sources. 

If you don't have your own pepper plants (yet), this might encourage you to start growing them in your garden or on your balcony. Plants are available in most local plant nurseries, or you can grow them from seed. Here is a good online guide I found for growing peppers indoors or in pots: http://s14.zetaboards.com/TGTA/topic/6732251/1/)

Pickled peppers
What you'll need (adjust quantities as necessary):
-Red peppers
-300 gm sea salt (coarse or ground)
-2 liters of water
-1 liter of vinegar
-1 pan + jars

Pick you red peppers fresh (they should be red and firm) then wash them in water on the same day. Allow the peppers to dry on a newspaper or towel indoors (you can place them under a fan). Remove any leaves or long stems.

Dilute the sea salt in water and bring it to a boil. Allow the salt water to cool down to room temperature then mix in the vinegar; you now have a basic pickling solution you can use for a variety of vegetables.

Get a sterilized jar for your peppers. An easy way to sterilize a jar is to wash it thoroughly then rinse it well. Place your jar in the microwave for a minute or until all traces of water evaporate. Remove the jar from the microwave (Warning: use kitchen gloves as the glass will be very hot) and allow it to cool down a little.

Place your peppers inside a sterilized jar (try to fill it to the top, shaking the jar and pressing the peppers down gently). Some people like to add herbs, garlic cloves, green almonds or small onions to their pickled peppers for extra flavor - go ahead and experiment or keep it simple with peppers only. Add the pickling solution in the jar so as to cover the peppers entirely (the peppers will float to the top, so you can cover them with a slice of lemon to keep them down.

Close your jar tightly then place it in a pan with water. Bring the water to a boil then remove the jar and place it upside down to cool. This will prevent air bubbles from forming inside. When you jar has cooled down, place it in an upright position in a cool dark place away from sunlight. You should wait at least 1 week for your peppers to pickle before opening the jar. Once open, you can keep the jar in a cool dry place or refrigerate it for extended periods. Your pickled peppers should last 1 year or more if you used well-sterilized jars and store them carefully.

Tip: Do not throw away any excess pickling solution. You can store it in a sterilized jar in a cool dark place for future pickles

Dried peppers
After I finished pickling my tabasco peppers, I had a few left over that weren't enough to fill even a small jar, so I decided to dry them. They can still be used for cooking afterwards, but I personally use them to make chili-flavored olive oil (it tastes great with pizza or baked potatoes).

What you'll need:
-Red peppers
-Needle and thread (preferably a strong thread or fishing line)

Sterilize a sewing needle by burning its tip and wiping it with alcohol. Thread the needle with a strong thread or fishing line (I didn't have any fishing line or strong thread, so I used a double line of regular sewing thread). Run the needle and thread through the center of each pepper. When you're done, make a loop and tie it so it looks like a necklace.

Hang your pepper necklace in a dry, ventilated place away from direct sunlight (or cover it with a newspaper) for about a week until the peppers start to dry. Store your dry peppers inside an airtight container (like a jar) in a cool dark place. Dried peppers should last 1 year or more if stored correctly.
Picture
All set: the pickled peppers are cooling down and the rest are ready to be hanged for drying
6 Comments

DRYING YOUR OWN HERBS: EASIER THAN YOU THINK

4/25/2014

2 Comments

 
Submitted by Anabel Gravel Chabot

Drying herbs is easy and doesn’t require any special equipment or skill. Setting up your own drying system is fun and provdes you with a healthy way to start drinking herbal teas from your own harvest and avoid the pesticides, artificial ingredients, added flavors and GMOs commonly found in commercial tea brands like Lipton, Twinings and Celestial Seasonings (http://foodbabe.com/2013/08/21/do-you-know-whats-really-in-your-tea/)

Tested and approved methods to dry herbs
The drying process is natural. If you leave a bunch of mint on your kitchen counter, it will dry no matter what. Therefore, when it comes to drying herbs, your only task is to make sure your herbs are getting adequate heat and ventilation. There are countless ways to set up a drying system, but here are the 3 main rules you must keep in mind:

-Keep the herbs away from sunlight
-Set your dryer in a well-ventilated space
-Do not store your herbs before they are completely dry

Picture
Drying isn't hard, so get creative and look for materials around the house you can reuse to create your own dryer. I have dried herbs in various settings and climates from tropical Thailand to cold Canada and sunny Lebanon, with equally good results. Here are my 3 favorite techniques:

The mosquito net method:
This easy setup supplies maximum air and heat to the herbs and will almost always give you good results. It is ideal for delicate parts like flowers. With this method, herbs will dry quite fast, between 1 to 6 days depending on the type of herbs you’re drying and the climate.

Picture
1. Lay your fresh herbs on a mosquito net or an oven tray. Basically, you can use anything that holds the herbs up while letting air through - be creative. Make sure the herbs don’t overlap.
2. Cover the surface that will be exposed to the sun with 1 layer of newspaper. To make sure the wind won’t interfere, secure the newspaper with laundry clips, strings or an elastic band.
3. Put your dryer in a sunny area above ground with the help of chairs, or suspend it with ropes. The goal is to have air flowing through.
4. Wait and monitor the process. Make changes as needed, like changing the location of your dryer to a sunnier and windier space.

Pictures: Hoary basil drying. This setup is similar to the mosquito net method but is directly on the floor instead of a surface that allows air through. The herbs will then be covered with a newspaper and weighed down. This method needs more drying time but requires only newspaper.

PictureThe bouquet method in an indoor setting
The bouquet method:
This is the ultimate lazy setup that can be realized in virtually any surrounding. It will work well with just about any herb but it is ideal for herbs that are not very humid, like rosemary and sage.

1. Tie together herbs in a small bouquet not wider than 3 fingers.
2. Hang the bouquet upside down in a shaded and well-ventilated area, for example a closet with a fan, or a shaded terrace or balcony. You can also use the clothesline where you usually hang your laundry - just make sure you cover your harvest with newspaper to avoid burning.
3. Wait and monitor the process. 
4. Make any changes needed, such as reducing the size of the bunches or adding a fan. With this method, herbs will dry in 3 to 9 days.

The low-heat oven method:
This method works well for harder plant parts that contain a lot of water, like roots and fruits. Do not use this method for flowers or leaves, as you will only turn them to ash.

1. Slice the fruits or roots as thin as you can. Aim for less than 5 mm thickness for a fast drying.
2. Preheat your oven at minimum heat. The lower the heat, the better the result.
3. Lay your roots/fruits on a pan making sure they don’t overlap. Place the pan in the center of the oven. Do not completely close the oven door so as to allow water to escape and speed up the process.
4. Wait and monitor. Oven-drying is quite fast compared to other methods, but you can burn your batch if you leave it too long in the oven. Roots can be left overnight, while fruits are different in shapes and water content and will require you to peek in the oven every 2 hours or so.

Go ahead and start drying!
Here are 3 herbs worth having around that are easily available directly from nature or from the supermarket. I cannot stress how important buying organic fresh herbs is, especially in a country where pesticides regulation is nowhere to be found. ‘’Do no harm’’ should always be the motto when it comes to medicine, and pesticides do harm.
PictureDried mint
Mint
Mint is by far the easiest herb to find in Lebanon. If you do not know someone who grows it at home, you can find it anywhere from supermarkets to small shops, but I recommend Souk el Tayeb for the best organic quality. You can use the bouquet method to dry this one, just make sure you tie it in small bunches.
Mint is refreshing and cooling; it is well-suited for a late afternoon invigorating infusion as well as an after-dinner digestive tonic. It has no equal to help bloated and hypersensitive digestive systems. It is great against headaches, so next time try a strong infusion instead of Panadol.

PictureDried rose
Rose
If the smell and taste of rose is not enough to convince you to give it a try, know that it is an efficient medicinal herb too, with its soothing action on the heart and the emotions.  It is a calming, sweet herb I recommend for people feeling a little sad or heartbroken. It also relieves and prevents menstrual cramps.
The best time to pick rose flowers is right before they are fully bloomed. Any fragrant variety of rose will do, though I have a sweet spot for Damascus rose and the small roses you can find in the wild. Avoid ornamental varieties, as they have virtually no smell and contain no medicine.  Roses are very delicate and the whole flower should be dried with the mosquito net method.

PictureDried orange
Citruses
Lemons, oranges, grapefruits and pomelos are really fun to dry. You can slice them to keep their original circle shape and pulp. They will make beautiful decoration items and will add a nice touch to your tea blends. You can also peel and slice the fruit's skin, discarding the pulp, for a more medicinal product. Both cases require the low-heat oven method.
Citruses are digestive tonics and energy stimulant. They make every cup of tea taste better. Try the citrus-vanilla-orange blossom water (mazaher) combination for an energy boosting morning tea.

Take care of yourself and enjoy your cup of home-made wellness!

Visit my Facebook page Flower Power Herbalism to find out more about healing with herbs.https://www.facebook.com/flower.power.medicinals
2 Comments

2 RECIPES FOR HOME-MADE SOAP

3/6/2014

7 Comments

 
Picture
Recipe by Bassam Khawand
This is a recipe I found online and always use. I find it works well all the time. I have recently tried adding honey from my own beehives to my soap but I still need to find the right dosage.

Ingredients (adjust quantities as necessary):
-10 kg of olive oil
-1.5 kg of caustic soda (sodium hydroxide)
-3.5 liters of water
-250 gm of table salt
*Optional: Honey, laurel oil or other aromatic essential oils (lavender, lemon, rosemary, etc.)

Instructions:
1. Add the water to the caustic soda slowly in a plastic bowl and stir with a wooden spoon
*WARNING* Caustic soda is highly corrosive and can cause serious burns to the skin and blindness if it comes in contact with the eyes. Always wear gloves and goggles when handling it
2. Let the mixture cool for 4 hours
3. Add the salt while mixing constantly
4. Add the olive oil slowly while mixing and turning constantly until the mixture becomes thick and cohesive
*You may add laurel oil to the olive oil with a ratio of 1 to 10 before adding it to the mixture
5. Pour the mixture in a large mold or smaller ones
6. Let the soap dry for 2 weeks, away from sunlight
7. If you used a large mold, cut out bars of 10 cm x 5 cm or weighing approximately 100 grams

Picture
Recipe by Liza Charbel
Ingredients:
-1,000 gm of olive oil (Note: 1 liter of oil = 920 gm)      
-124 gm of caustic soda (sodium hydroxide)
-340 gm of water
-Laurel leaves

Instructions:
1. Dissolve the caustic soda little by little in the water
2. Stir slowly with a stainless steel spoon
3. Let the mixture cool to 45 °C
*WARNING* Caustic soda can reach a temperature of 90 °C very quickly when mixed with water 
4. Warm the oil slowly in another container to reach 45 °C
5. When both liquids are at the same temperature, mix them until they have a unified “yoghurt” texture (when you move a spoon across it, it should leave a “trace”)
6. Put laurel leaves in the bottom of a mold (cake or cupcake mold) then cover with the mixture
7. Cover the mold with cling film stuck to the paste
8. After 24-48 hours, remove the soap - if you used a large mold, you can cut out small bars
9. Let your soap dry for at least 4 weeks on a grill in a well-ventilated area

7 Comments

I MADE COMPOST ON MY BALCONY - AND SO CAN YOU!  

3/6/2014

3 Comments

 
Submitted by Nathalie Rosa Blucher - Beirut
Last February, the garbage was piling up in Beirut’s streets and I had toyed with the idea of having a compost on my balcony for some time, so I decided to jump into action. I bought a 17.5 litre bucket with lid at the dollar store around the corner, gathered some cardboard, egg cartons, newspaper, a small stash of organic waste and a bag of soil from a construction site across the street which my grocer helped me acquire.

On February 13, I drilled holes in the bucket (bottom and below the rim) and filled it with three layers: shredded egg cartons and newspaper, organic waste and 2 scoops of soil. I knew the soil would be quite dead but I purposefully chose it since most Beirutis would have access to this kind of soil only. Then I closed the lid and waited…

The compost quickly attracted flies and small insects and began to smell very earthy – a nice smell, actually. I kept adding organic waste such as (organic) egg shells, orange rinds (not too many to avoid having a highly acidic compost), vegetables and fruit peels, and a few bits of leftover or rotten food. I left out tea bags (they usually are bleached with chloride) and banana peels (they are usually heavily fertilised). Oh, and hair! The girls in the house empty their brushes over the compost and the guys add bits of cut-off fringe.

After 3 weeks, the compost was three quarters full and appeared really healthy. I always add a bit of soil when the layer of organic stuff gets 3-4 cm thick. My permaculture network friend Alexis gave me some “live” microorganism-rich compost from the pile in his garden, which upgraded our compost from 2 to 4 stars, I reckon.

I’m planning to start a second compost in March, this time with worms (I will be borrowing books about this from another friend in our network, Wolfgang) to compare results.

Composting on my balcony turned out to be an easy thing to do and the amount of waste it reduced in a 4-person household was considerable.

If you feel inspired, yalla go ahead! This helpful link from my friend Rita helped me get started: http://www.apartmenttherapy.com/how-to-make-your-own-indoor-co-138645 
Picture
Picture
Picture
3 Comments

    Author

    Permaculture community in Lebanon

    Archives

    August 2016
    July 2015
    April 2015
    January 2015
    July 2014
    April 2014
    March 2014

    Categories

    All
    Beeswax
    Compost
    Do It Yourself
    Dry
    Entomology
    Fertilizer
    Herbs
    Identification
    Infusion
    Insects
    Natural Polish
    Nettles
    Pickle
    Recipe
    Red Peppers
    Soap
    Tabasco
    Urban Gardening

Powered by Create your own unique website with customizable templates.